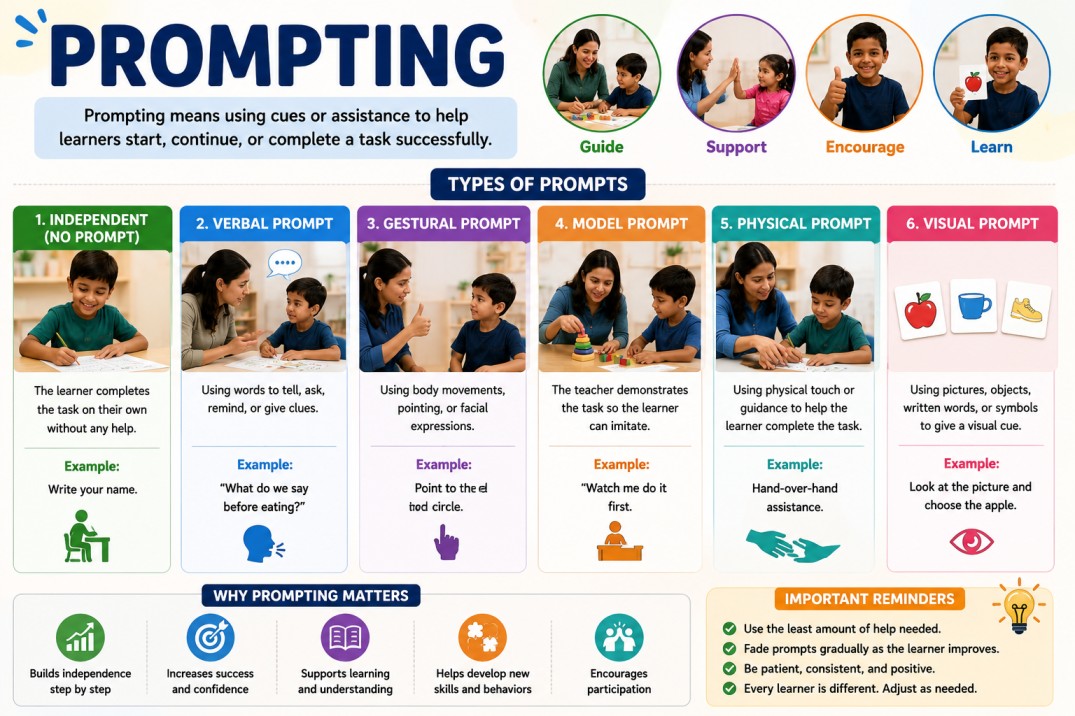
Prompting is a way to help students learn and practice a new skill. We usually use prompts when a student has a hard time following an instruction on their own. Prompts are also great for “errorless learning.” This means giving the student enough help so they get the answer right on the first try. When they succeed, we can praise or reward them, which makes them more likely to do it correctly again.
Teachers rarely use prompting all by itself. It works best when combined with other helpful teaching tools, like showing the student what to do (modeling), giving rewards, using pictures, or reading social stories.
There are many different types of prompts. Some give a lot of help, like physically guiding a student’s hands to finish a task. Others give just a little hint, like pointing to a picture. Because every student and situation is different, teachers need to choose the right amount of help. They also need a plan for “fading” the prompt. Fading means slowly taking the extra help away so the student can eventually do the task completely on their own.
Physical Prompt
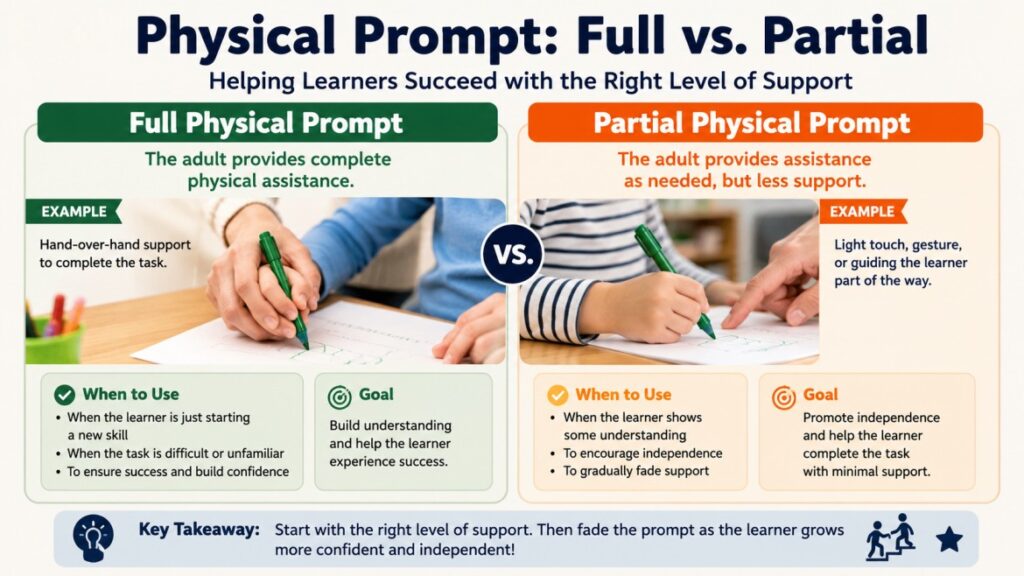
A physical prompt is the most intrusive level of support in the prompting hierarchy. It involves an educator using manual, physical contact to guide a student through the correct movements of a target skill or behavior.
Because it leaves almost no room for the student to make a mistake, it is frequently used when teaching brand-new motor skills or when utilizing an “errorless learning” approach, ensuring the student is immediately successful and can be reinforced.
Types of Physical Prompt
Physical prompts are generally divided into two categories based on the amount of contact and control provided by the educator:
Full Physical Prompt:
This is the highest level of assistance. The educator places their hands entirely over the student’s hands (or body part) and physically manipulates them through the entire action.
If the goal is for the student to cut a piece of paper, the educator puts their hand over the student’s hand on the scissors and does the squeezing and guiding motions for them.
The very first stages of learning a complex motor task, or for students who have profound difficulty imitating a modeled action.
Partial Physical Prompt:
The educator provides some physical guidance but allows the student to initiate or complete part of the movement themselves. It usually involves a lighter touch or touching a body part further away from the action (like guiding from the elbow or shoulder rather than the hand).
Gently nudging a student’s elbow toward their spoon so they remember to pick it up and eat, but letting them actually grasp the spoon themselves.
Students who know what to do but need a physical “jumpstart” to begin the action, or as a stepping stone when fading away from a full physical prompt.
The importance of fading:
Because physical prompts do the work for the student, they carry a very high risk of prompt dependency—where the student learns to wait for the teacher’s touch before attempting the task.
To build true independence, educators must intentionally “fade” the prompt as quickly as the student’s success allows. A common fading sequence for a motor task might look like this:
- Full Physical: Hand-over-hand guidance.
- Partial Physical: Guiding from the wrist.
- Partial Physical: A light tap on the elbow.
- Gestural/Visual: Pointing at the object without touching the student.
- Independence: The student completes the task on their own.
Modelling
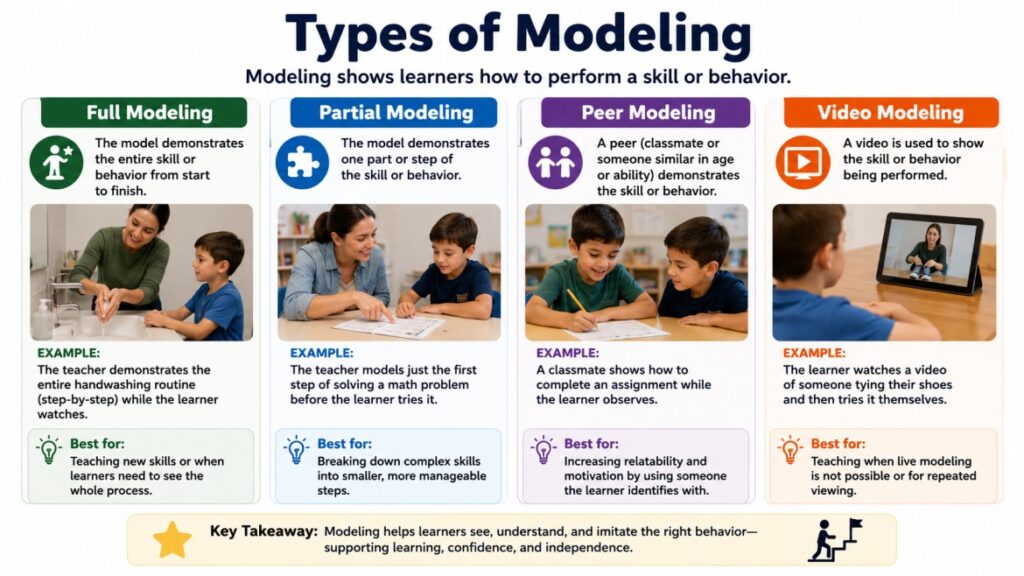
Modeling (or a modeling prompt) is when an educator demonstrates the exact skill or behavior they want the student to perform. Instead of physically guiding the student or just telling them what to do, the educator shows them, giving the student a clear example to copy.
It sits just below physical prompting on the hierarchy of intrusiveness—it requires no physical contact, but still provides a highly direct, obvious level of support.
The One Prerequisite
For a modeling prompt to work, a student must possess imitation skills. If a student hasn’t yet learned how to watch another person and copy their actions, a modeling prompt will not be effective.
In those cases, educators often have to use physical prompts to teach the core skill of imitation first (e.g., saying “Do this,” and then using hand-over-hand guidance to help them clap).
Types of Modeling
Modeling isn’t just an adult showing a child what to do; it can take several forms depending on the student’s needs:
- Full Model: The educator demonstrates the entire task from start to finish.
- Example: To teach a student how to zip a jacket, the teacher zips up their own jacket entirely, then says, “Your turn.”
- Partial Model: The educator demonstrates only the first step or a small part of the task to jog the student’s memory.
- Example: The teacher connects the zipper at the bottom, but leaves the actual pulling action for the student to complete.
- Peer Modeling: Using another student to demonstrate the correct behavior. This is highly effective for social skills, play skills, and classroom routines, as students often pay closer attention to their peers than to adults.
- Video Modeling: The student watches a short video of someone completing the desired task right before they attempt it. This is a very powerful, evidence-based tool (especially for neurodivergent students) because it provides a perfectly consistent, repeatable demonstration without the social pressure of face-to-face interaction.
Fading a Modeling Prompt
Just like physical prompts, modeling needs to be faded to prevent prompt dependency. You can fade a model by:
- Reducing the model: Moving from a full model to a partial model.
- Delaying the model: Waiting 3–5 seconds after giving an instruction to see if the student will start on their own before jumping in to show them.
- Shifting the prompt type: Transitioning to a less intrusive prompt, such as pointing (a gestural prompt) or using a visual schedule.
Gestures
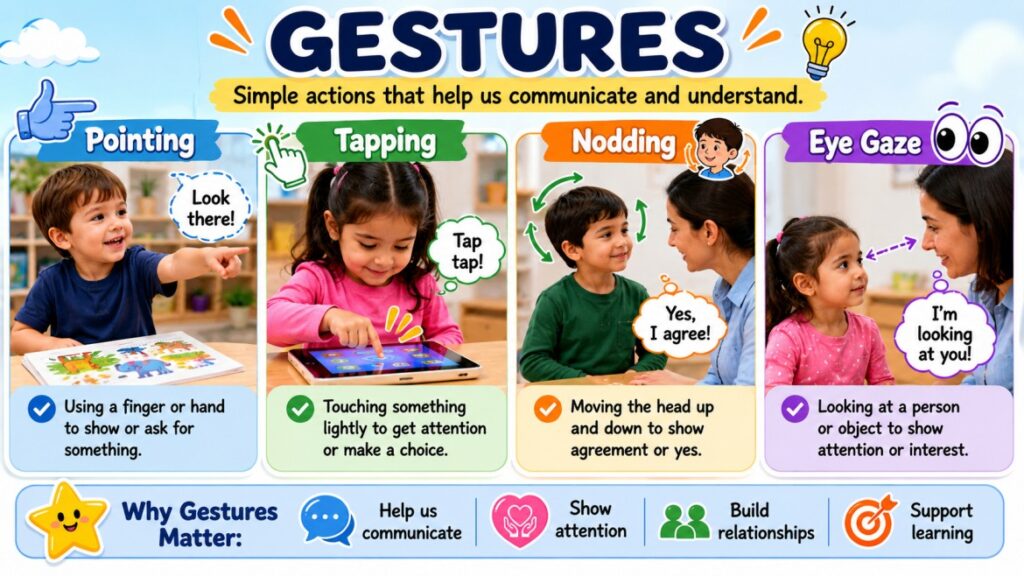
A gestural prompt is a cue where the educator uses a physical movement to direct the student’s attention to the correct answer or action, without actually touching the student or doing the task for them.
Sitting right in the middle of the prompt hierarchy, it is less intrusive than physical or modeling prompts, but more intrusive than verbal or visual prompts. To be effective, the student must already have the ability to follow a point or understand what the gesture means.
Types of Gestural Prompts
A gesture doesn’t only mean pointing with a finger. It can include any body movement that signals the right choice:
- Pointing: The most common form. The educator points directly at the correct flashcard, the right hook for a backpack, or the next step on a worksheet.
- Tapping: Tapping the desk next to the correct item, or tapping a chair to indicate the student should sit down.
- Nodding: Giving an affirming head nod toward an object the student is hovering over, signaling, “Yes, that’s the one.”
- Eye Gaze (Looking): The most subtle gestural prompt. The educator simply shifts their eyes to stare directly at the correct item or location, waiting for the student to follow their gaze.
Fading a Gestural Prompt
Because gestures are natural in everyday human communication, students can easily become reliant on an adult pointing the way. You can fade a gestural prompt by gradually making the movement smaller or more distant:
- Full Point: Pointing until your finger is almost touching the correct item.
- Distance Point: Pointing from a few feet away.
- Subtle Gesture: A quick nod or a shift in eye gaze toward the item.
- Independence: Providing the instruction and waiting, with hands down and neutral body language, for the student to respond on their own.
Symbols
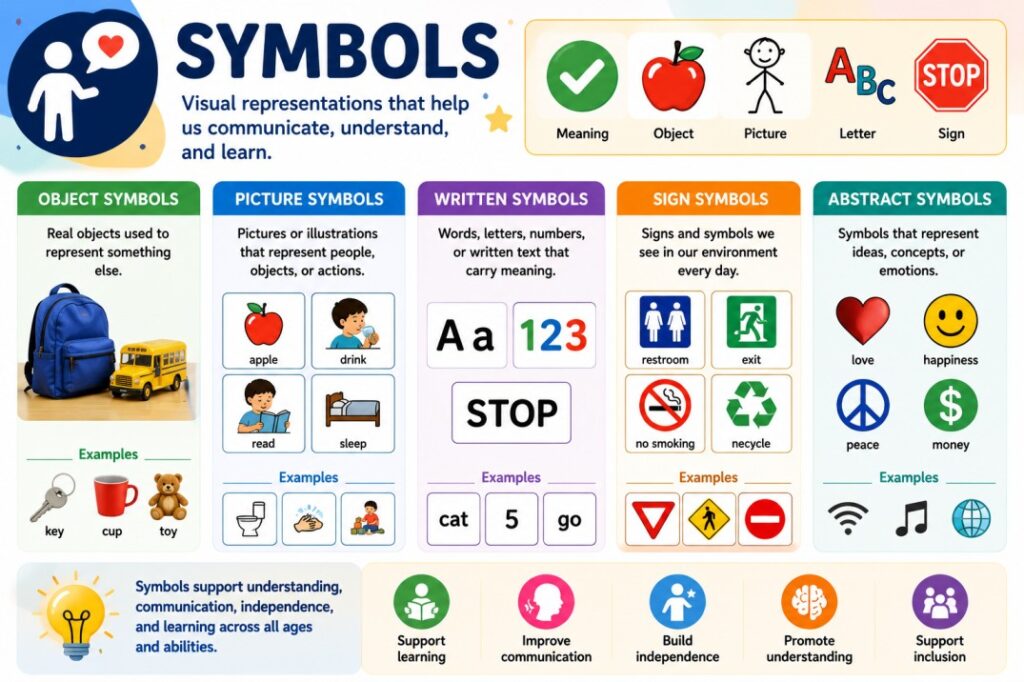
In special education, symbols fall under the category of visual prompts, which are the least intrusive level of support. A symbol prompt uses a 2D representation—like a picture, line drawing, or written word—to cue a student on what to do next, how to complete a task, or how to communicate.
Because they don’t require an adult to physically touch or speak to the student, symbols are incredibly powerful tools for building true, long-term independence.
The Hierarchy of Abstraction
Not all symbols are created equal. They exist on a spectrum of abstraction. When introducing visual prompts, educators usually start concrete and move toward the abstract as the student’s cognitive and processing skills grow:
| Symbol Type | Level of Abstraction | Best For |
| Photographs | Very Concrete | Early learners. They represent specific, real-world items (e.g., a photo of the student’s actual blue backpack). |
| Line Drawings / Icons | Moderate | Generalizing concepts. A simple drawing of a backpack means any backpack, not just one specific bag (e.g., Boardmaker symbols). |
| Written Text | Highly Abstract | Readers. The word “backpack” requires decoding and reading comprehension skills. |
Common Uses for Symbol Prompts
- Visual Schedules: Using a sequence of symbols to show the events of the day, which prompts the student on where to go next and reduces anxiety about transitions.
- First/Then Boards: A simple two-symbol board (e.g., First [Symbol of Math Work], Then [Symbol of iPad]) to prompt task completion.
- Task Analysis: Breaking down a complex, multi-step skill (like washing hands, using the bathroom, or packing a bag) into a step-by-step strip of symbols placed right where the task happens.
- Environmental Labels: Placing a symbol of crayons on the crayon bin to prompt students on where to return materials independently.
Why Symbols Are So Effective
The biggest advantage of a symbol over a verbal prompt is permanence.
Spoken words disappear the exact second they are said. If a student has auditory processing delays or working memory challenges, that verbal instruction is gone before they can act on it. A symbol, however, stays exactly where it is. It gives the student the extra processing time they need and allows them to reference the instruction multiple times without having to ask an adult for help.
Fading Symbol Prompts
Even though visual prompts are the least intrusive, you still want to fade them if the ultimate goal is complete, natural independence. You can fade symbol prompts by:
- Reducing size: Making the picture smaller and smaller over time so it becomes less obvious.
- Increasing abstraction: Moving from a photograph to a line drawing, and eventually fading the picture out entirely to leave just a written checklist.
- Changing location: Moving the symbol from directly in front of the student’s workspace to a central location on the classroom wall, requiring them to actively remember to go check it.
Verbal Prompt
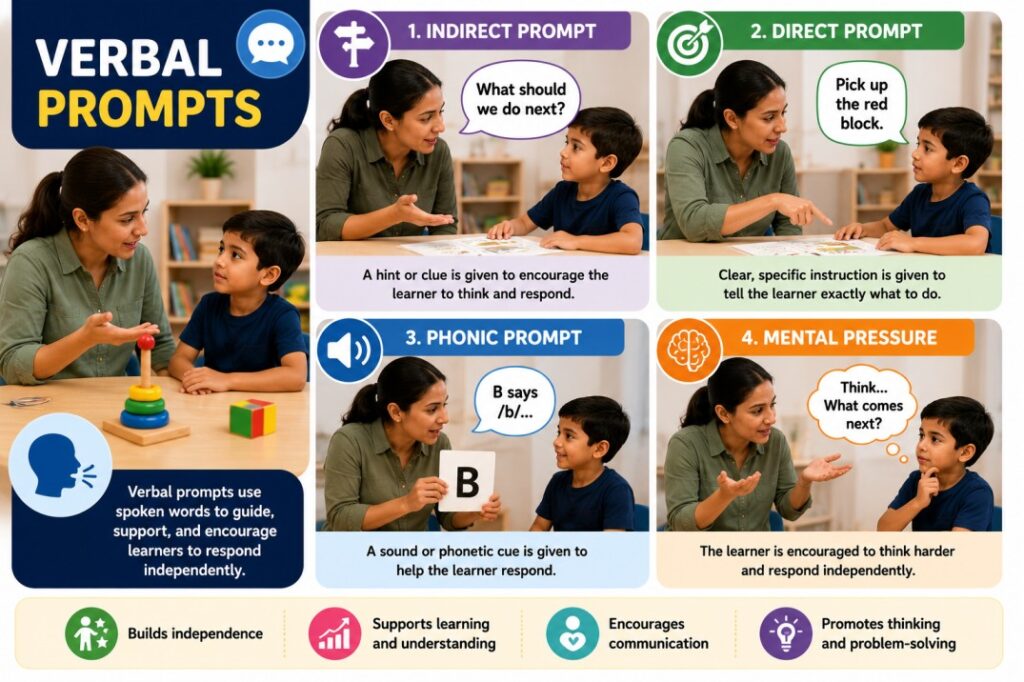
A verbal prompt involves using spoken words, vocalizations, or signs to instruct a student on what to do. While it is the most natural way people communicate, in special education, verbal prompts are notorious for being the most difficult to fade.
Because we use our voices constantly, students can easily develop prompt dependency—learning to wait for the teacher’s voice before initiating a task they are actually fully capable of doing on their own.
Types of Verbal Prompts
Verbal prompting exists on a spectrum from gentle hints to firm expectations:
- Indirect Verbal Prompt: The educator uses a question or a subtle hint to jog the student’s memory without giving away the exact answer.
- Examples: “What do we do next?” or “Where does this piece go?”
- Direct Verbal Prompt: The educator explicitly states the exact behavior or action the student needs to perform.
- Examples: “Write your name at the top,” or “Put the red block in the bin.”
- Phonemic Prompt: Providing just the first sound of the target word to trigger the student’s memory. This is frequently used in speech and language development.
- Example: Pointing to a picture of a dog and saying “D—” to prompt the student to say “Dog.”
- Mental Pressure: A specific pedagogical approach utilized for demanding task completion. It involves using firm, unwavering verbal directives and expectations when a student possesses the necessary skill but requires an authoritative push to overcome task refusal or initiation hurdles.
The Challenge of Fading
Verbal prompts are uniquely challenging to fade because you cannot easily “half-say” a word the way you can provide a “half-point” (gestural) or a “half-physical” guide. Effective fading strategies include:
- Time Delay: The most effective method for fading verbal dependency. Give the initial instruction, then wait a specific amount of time (e.g., 3–5 seconds) in total silence before providing the verbal prompt. This gives the student’s processing speed a chance to catch up.
- Volume Fading: Gradually reducing the volume of the prompt from a normal speaking voice, to a whisper, to eventually just mouthing the words.
- Truncating: Shortening the direct prompt over time (e.g., “Put the book in your bag” ⟶ “Put book in bag” ⟶ “Book in bag” ⟶ “Book”).
How can we use prompting in learning of an individual?

1.Deliver the Cue (Discriminative Stimulus):
Provide a clear, concise instruction or present the learning material. This is the signal for the student to act.
- Example for speech development: Holding up a picture of a cat and saying, “What is this?”
- Note on task refusal: If the student possesses the target skill but exhibits hesitation or task refusal at this stage, this is where you might apply mental pressure—using firm, unwavering verbal directives to demand task completion and help them overcome the initiation hurdle.
2.Implement the Wait Time:
Do not prompt immediately after your instruction. Wait 3 to 5 seconds in total silence. This is the most frequently missed step in special education. You must give the student’s processing speed a chance to catch up and allow them the opportunity to respond independently.
3.Apply the Prompt (If Necessary):
If the 3–5 seconds pass without a correct response (or if the student begins to make an error), step in immediately with the chosen prompt. Provide only the minimum amount of assistance required to ensure they get it right.
- Example: If the student doesn’t say “Cat,” you immediately provide a phonemic prompt: “C—”.
4.Reinforce the Response:
As soon as the student completes the behavior—even if it was heavily prompted—provide reinforcement. However, you must use differential reinforcement: offer your highest-value praise or reward for independent responses, and a more neutral acknowledgment (like a simple “Good job”) for prompted responses. This teaches the student that independence pays off more than waiting for help.
To decide which prompt to apply in Step 3, you need to choose an overarching strategy based on where the student is in their learning journey:
1. Most-to-Least Prompting (For Skill Acquisition)
Use this when teaching a brand-new skill or drafting exercises for the earliest identification stages of a developmental goal.
- The Method: Start with the most intrusive prompt necessary to guarantee success (e.g., a full physical guide or a direct verbal model). Over successive trials or days, systematically move down the hierarchy to less intrusive prompts.
- Why it works: It utilizes “errorless learning.” The student practices the correct pathway from day one, preventing them from accidentally memorizing their own mistakes.
2. Least-to-Most Prompting (For Skill Maintenance)
Use this when a student has already demonstrated they can do the skill, but they are inconsistent or need a reminder.
- The Method: Give the instruction and wait. If they don’t respond, provide the least intrusive prompt first (e.g., a visual cue or a glance). If they still struggle, move up the hierarchy to a gestural prompt, then a verbal one, only using physical guidance as a last resort.
- Why it works: It acts as a safety net. It gives the student the maximum opportunity to be independent while ensuring they don’t get permanently stuck.